During a bushfire, 95% of homes lost are due to Ember Attack!
Drencher Head Required Maintenance
We have discovered two issues with our Drencher Head, a little care and maintenance can fix them bot
We have had reports of an issue with the nozzle in the end of the arm coming loose and the second is a squeaking noise from the spinning assembly.
We have listed below the maintenance required to address both issues.
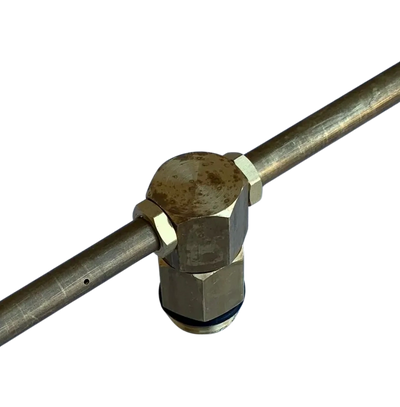
Issue - Arm Nozzles come loose

The Nozzles were not correctly tightened on assembly.
We are committed ensuring our products perform, unfortunately mistakes happen and one of our team missed the step of tensioning up the arm nozzles.
We ask that you check your drencher and tension the nozzle if required.
If the nozzle has undone and fallen out then please contact us so we can organise sending a replacement.

Instructions on Tensioning.
Holding the arm in your hand, use a small spanner (3/8) or a small shifter to tension the nozzle clockwise.
It doesn’t need to be super tight!
Issue - Squeaking and irratic rotation
Spinning Assembly Friction
During our development of the Drencher Head our research determined that the contact point between the spindle and housing would not require a seal as the water would provide lubrication and cooling.
Unfortunately we have been made aware that with different conditions and water quality the water is not enough.
So we have added a teflon (PTFE) washer to the assembly to both seal and remove the friction.
If you received your drencher after Australia Day 2026 then the washer will be installed.
We will contact all affected customers by mid February 2026, if you have not been contacted by then please make contact with us on 0466116266.
Please follow the instruction below to install the washer.

Parts and Tools
You will need to remove the head from its mount using a shifter.
Once separated from the mount, to install the washer you will need a flat bladed screw driver.

Dismantle the Spinning Assembly
Unscrew the spindle from the Tee Head by turning it anti-clockwise using a flat bladed screw driver.

Slip the Washer onto the Spindle
Carefully slip the washer onto the spindle and slide it down until it reaches the flat face. DO NOT FORCE THE WASHER AS IT MADE FROM TEFLON, IF NEEDED USE A LUBRICANT LIKE WD40 OR OLIVE OIL.
Once fitted then screw the assembly back together and refit to the mounting point.